In this article, we explore interfacing STM32 LCD Display of various sizes, like 16×2 and 20×4, using Proteus simulation

Things used in this project
Software apps and online services:
1- STMicroelectronics STM32CubeMX
2- STMicroelectronics STM32CubeIDE
3- Proteus 8
Interfacing Multiple Displays with STM32 Microcontroller in 4-Bit Mode: A Guide to LCD Integration and Operation:
In this project, we will connect multiple STM32 LCD Displays to the STM32 microcontroller using the 4-bit mode, which requires six GPIO pins. The STM32 operates at 3.3V logic levels, while the LCD Displays operate at 5V. However, this is not a problem because the displays can still recognize the 3.3V output from the STM32. The only 5V line required is the VDD line for the displays, which can be powered using the 5V pin on the STM32 board. We will simulate this setup using Proteus software. Following this article, we will take the 16×2 LCD Display as an example to explain how these displays work.
Liquid crystal displays (LCD Displays) are commonly used to display data in devices such as calculators, microwave ovens, and many other electronic devices. The 16×2 LCD Display features a 16-pin header interface and assumes it has the standard Hitachi LCD driver, HD44780 controller. We’ll see how it works internally and how to interface it with the STM32.
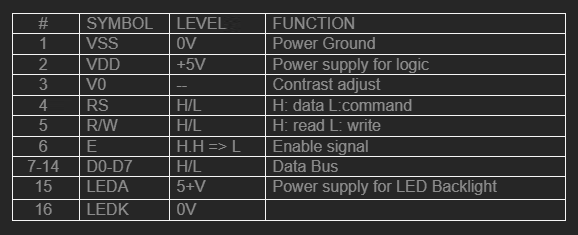
LCD Module Pinout:
This is the pinout for a typical 16×2 LCD Display unit.

Pins’ Functions Description:

LCD Controller IC:
The LCD Display module consists of 16×2 character cells, and each one of them is 5×8 dots. Controlling all of this is a tedious task for our main STM32 microcontroller. However, it doesn’t have to do this directly, as there is a specific function controller on the LCD itself that manages the display while reading in the user’s commands and data. Here, I’ll be considering the Hitachi HD44780 controller.
STM32CubeMX Configuration:
- Open CubeMX & Create New Project Choose The Target MCU STM32F103C6 & Double-Click Its Name
- Go To The Clock Configuration & Set The System Clock To 8MHz
- Configure The GPIO Pins [PB3..PB9] as Output Pins
- Generate The Initialization Code & Open The Project In CubeIDE
- Create header and source file for liquid crystal
STM32CubeIDE Configuration :
- Write The Application Layer Code
- LiquidCrystal.h & LiquidCrystal.c
- main.c
#ifndef LIQUIDCRYSTAL_H_
#define LIQUIDCRYSTAL_H_

// commands
#define LCD_CLEARDISPLAY 0x01
#define LCD_RETURNHOME 0x02
#define LCD_ENTRYMODESET 0x04
#define LCD_DISPLAYCONTROL 0x08
#define LCD_CURSORSHIFT 0x10
#define LCD_FUNCTIONSET 0x20
#define LCD_SETCGRAMADDR 0x40
#define LCD_SETDDRAMADDR 0x80

// flags for display entry mode
#define LCD_ENTRYRIGHT 0x00
#define LCD_ENTRYLEFT 0x02
#define LCD_ENTRYSHIFTINCREMENT 0x01
#define LCD_ENTRYSHIFTDECREMENT 0x00

// flags for display on/off control
#define LCD_DISPLAYON 0x04
#define LCD_DISPLAYOFF 0x00
#define LCD_CURSORON 0x02
#define LCD_CURSOROFF 0x00
#define LCD_BLINKON 0x01
#define LCD_BLINKOFF 0x00

// flags for display/cursor shift
#define LCD_DISPLAYMOVE 0x08
#define LCD_CURSORMOVE 0x00
#define LCD_MOVERIGHT 0x04
#define LCD_MOVELEFT 0x00

// flags for function set
#define LCD_8BITMODE 0x10
#define LCD_4BITMODE 0x00
#define LCD_2LINE 0x08
#define LCD_1LINE 0x00
#define LCD_5x10DOTS 0x04
#define LCD_5x8DOTS 0x00


// low-level functions
void send(uint8_t, GPIO_PinState);
void write4bits(uint8_t);
void write8bits(uint8_t);
void pulseEnable(void);

// initializers
void LiquidCrystal(GPIO_TypeDef *gpioport, uint16_t rs, uint16_t rw, uint16_t enable,
  uint16_t d0, uint16_t d1, uint16_t d2, uint16_t d3);

void init(uint8_t fourbitmode, GPIO_TypeDef *gpioport, uint16_t rs, uint16_t rw, uint16_t enable,
    uint16_t d0, uint16_t d1, uint16_t d2, uint16_t d3,
    uint16_t d4, uint16_t d5, uint16_t d6, uint16_t d7);

void begin(uint8_t cols, uint8_t rows);
void enableClock(void);

// high-level functions
void clear(void);
void home(void);

void noDisplay(void);
void display(void);
void noBlink(void);
void blink(void);
void noCursor(void);
void cursor(void);
void scrollDisplayLeft(void);
void scrollDisplayRight(void);
void leftToRight(void);
void rightToLeft(void);
void autoscroll(void);
void noAutoscroll(void);
size_t print(const char []);

void setRowOffsets(int row1, int row2, int row3, int row4);
void createChar(uint8_t, uint8_t[]);
void setCursor(uint8_t, uint8_t);
size_t write(uint8_t);
void command(uint8_t);


#endif /* LIQUIDCRYSTAL_H_ */
#include "stm32f1xx_hal.h" // change this line accordingly
#include "LiquidCrystal.h"
#include <stdio.h>
#include <string.h>

// change this to 0 if you want to use 8-bit mode
uint8_t _fourbit_mode = 1;

// change this to LCD_5x10DOTS for some 1 line displays that can select a 10 pixel high font
uint8_t dotsize = LCD_5x8DOTS;

// pin definitions and other LCD variables
uint16_t _rs_pin; // LOW: command.  HIGH: character.
uint16_t _rw_pin; // LOW: write to LCD.  HIGH: read from LCD.
uint16_t _enable_pin; // activated by a HIGH pulse.
uint16_t _data_pins[8];
GPIO_TypeDef *_port;

uint8_t _displayfunction;
uint8_t _displaycontrol;
uint8_t _displaymode;

uint8_t _initialized;

uint8_t _numlines;
uint8_t _row_offsets[4];

void LiquidCrystal(GPIO_TypeDef *gpioport, uint16_t rs, uint16_t rw, uint16_t enable,
           uint16_t d0, uint16_t d1, uint16_t d2, uint16_t d3)
{
  if(_fourbit_mode)
    init(1, gpioport, rs, rw, enable, d0, d1, d2, d3, 0, 0, 0, 0);
  else
    init(0, gpioport, rs, rw, enable, d0, d1, d2, d3, 0, 0, 0, 0);
}

void init(uint8_t fourbitmode, GPIO_TypeDef *gpioport, uint16_t rs, uint16_t rw, uint16_t enable,
       uint16_t d0, uint16_t d1, uint16_t d2, uint16_t d3,
       uint16_t d4, uint16_t d5, uint16_t d6, uint16_t d7)
{
  _rs_pin = rs;
  _rw_pin = rw;
  _enable_pin = enable;
  _port = gpioport;

  _data_pins[0] = d0;
  _data_pins[1] = d1;
  _data_pins[2] = d2;
  _data_pins[3] = d3;
  _data_pins[4] = d4;
  _data_pins[5] = d5;
  _data_pins[6] = d6;
  _data_pins[7] = d7;

  if (fourbitmode)
    _displayfunction = LCD_4BITMODE | LCD_1LINE | LCD_5x8DOTS;
  else
    _displayfunction = LCD_8BITMODE | LCD_1LINE | LCD_5x8DOTS;

 // begin(16, 2);
}

void begin(uint8_t cols, uint8_t lines) {
  if (lines > 1) {
    _displayfunction |= LCD_2LINE;
  }
  _numlines = lines;

  setRowOffsets(0x00, 0x40, 0x00 + cols, 0x40 + cols);

  // for some 1 line displays you can select a 10 pixel high font
  if ((dotsize != LCD_5x8DOTS) && (lines == 1)) {
    _displayfunction |= LCD_5x10DOTS;
  }

  //Initializing GPIO Pins
  enableClock();

  GPIO_InitTypeDef gpio_init;
  gpio_init.Speed = GPIO_SPEED_FREQ_HIGH;
  gpio_init.Mode = GPIO_MODE_OUTPUT_PP;

 if(_fourbit_mode)
    gpio_init.Pin = _rs_pin | _rw_pin | _enable_pin | _data_pins[0] | _data_pins[1] | _data_pins[2] | _data_pins[3];
  else
    gpio_init.Pin = _rs_pin | _rw_pin | _enable_pin | _data_pins[0] | _data_pins[1] | _data_pins[2] | _data_pins[3] |
                    _data_pins[4] | _data_pins[5] | _data_pins[6] | _data_pins[7];
// SEE PAGE 45/46 FOR INITIALIZATION SPECIFICATION!
// according to datasheet, we need at least 40ms after power rises above 2.7V
// so we'll wait 50 just to make sure
  HAL_Delay(50);

  // Now we pull both RS and R/W low to begin commands
  HAL_GPIO_WritePin(_port, _rs_pin, GPIO_PIN_RESET);
  HAL_GPIO_WritePin(_port, _enable_pin, GPIO_PIN_RESET);

  if (_rw_pin != 255) {
    HAL_GPIO_WritePin(_port, _rw_pin, GPIO_PIN_RESET);
  }

  //put the LCD into 4 bit or 8 bit mode
  if (! (_displayfunction & LCD_8BITMODE)) {
    // this is according to the hitachi HD44780 datasheet
    // figure 24, pg 46

    // we start in 8bit mode, try to set 4 bit mode
    write4bits(0x03);
    HAL_Delay(5); // wait min 4.1ms

    // second try
    write4bits(0x03);
    HAL_Delay(5); // wait min 4.1ms

    // third go!
    write4bits(0x03);
    HAL_Delay(1);

    // finally, set to 4-bit interface
    write4bits(0x02);
  } else {
    // this is according to the hitachi HD44780 datasheet
    // page 45 figure 23

    // Send function set command sequence
    command(LCD_FUNCTIONSET | _displayfunction);
    HAL_Delay(5);  // wait more than 4.1ms

    // second try
    command(LCD_FUNCTIONSET | _displayfunction);
    HAL_Delay(1);

    // third go
    command(LCD_FUNCTIONSET | _displayfunction);
  }

  // finally, set # lines, font size, etc.
  command(LCD_FUNCTIONSET | _displayfunction);

  // turn the display on with no cursor or blinking default
  _displaycontrol = LCD_DISPLAYON | LCD_CURSOROFF | LCD_BLINKOFF;
  display();

  // clear it off
  clear();

  // Initialize to default text direction (for romance languages)
  _displaymode = LCD_ENTRYLEFT | LCD_ENTRYSHIFTDECREMENT;
  // set the entry mode
  command(LCD_ENTRYMODESET | _displaymode);

}

// enables GPIO RCC Clock
void enableClock(void)
{
  if(_port == GPIOA)
    __HAL_RCC_GPIOA_CLK_ENABLE();
  else if(_port == GPIOB)
    __HAL_RCC_GPIOB_CLK_ENABLE();
  else if(_port == GPIOB)
    __HAL_RCC_GPIOB_CLK_ENABLE();
  else if(_port == GPIOC)
    __HAL_RCC_GPIOC_CLK_ENABLE();
  else if(_port == GPIOD)
    __HAL_RCC_GPIOD_CLK_ENABLE();

  // if you have a port that is not listed add it below the other else ifs
}

void setRowOffsets(int row0, int row1, int row2, int row3)
{
  _row_offsets[0] = row0;
  _row_offsets[1] = row1;
  _row_offsets[2] = row2;
  _row_offsets[3] = row3;
}

/********** high level commands, for the user! */
void clear(void)
{
  command(LCD_CLEARDISPLAY);  // clear display, set cursor position to zero
  HAL_Delay(2);  // this command takes a long time!
}

void home(void)
{
  command(LCD_RETURNHOME);  // set cursor position to zero
  HAL_Delay(2);  // this command takes a long time!
}

void setCursor(uint8_t col, uint8_t row)
{
  const size_t max_lines = sizeof(_row_offsets) / sizeof(*_row_offsets);
  if ( row >= max_lines ) {
    row = max_lines - 1;    // we count rows starting w/0
  }
  if ( row >= _numlines ) {
    row = _numlines - 1;    // we count rows starting w/0
  }

  command(LCD_SETDDRAMADDR | (col + _row_offsets[row]));
}

// Turn the display on/off (quickly)
void noDisplay(void) {
  _displaycontrol &= ~LCD_DISPLAYON;
  command(LCD_DISPLAYCONTROL | _displaycontrol);
}
void display(void) {
  _displaycontrol |= LCD_DISPLAYON;
  command(LCD_DISPLAYCONTROL | _displaycontrol);
}

// Turns the underline cursor on/off
void noCursor(void) {
  _displaycontrol &= ~LCD_CURSORON;
  command(LCD_DISPLAYCONTROL | _displaycontrol);
}
void cursor(void) {
  _displaycontrol |= LCD_CURSORON;
  command(LCD_DISPLAYCONTROL | _displaycontrol);
}

// Turn on and off the blinking cursor
void noBlink(void) {
  _displaycontrol &= ~LCD_BLINKON;
  command(LCD_DISPLAYCONTROL | _displaycontrol);
}
void blink(void) {
  _displaycontrol |= LCD_BLINKON;
  command(LCD_DISPLAYCONTROL | _displaycontrol);
}

// These commands scroll the display without changing the RAM
void scrollDisplayLeft(void) {
  command(LCD_CURSORSHIFT | LCD_DISPLAYMOVE | LCD_MOVELEFT);
}
void scrollDisplayRight(void) {
  command(LCD_CURSORSHIFT | LCD_DISPLAYMOVE | LCD_MOVERIGHT);
}

// This is for text that flows Left to Right
void leftToRight(void) {
  _displaymode |= LCD_ENTRYLEFT;
  command(LCD_ENTRYMODESET | _displaymode);
}

// This is for text that flows Right to Left
void rightToLeft(void) {
  _displaymode &= ~LCD_ENTRYLEFT;
  command(LCD_ENTRYMODESET | _displaymode);
}

// This will 'right justify' text from the cursor
void autoscroll(void) {
  _displaymode |= LCD_ENTRYSHIFTINCREMENT;
  command(LCD_ENTRYMODESET | _displaymode);
}

// This will 'left justify' text from the cursor
void noAutoscroll(void) {
  _displaymode &= ~LCD_ENTRYSHIFTINCREMENT;
  command(LCD_ENTRYMODESET | _displaymode);
}

// This will print character string to the LCD
size_t print(const char str[]) {
  if (str == NULL) return 0;

  const uint8_t *buffer = (const uint8_t *)str;
  size_t size = strlen(str);
  size_t n = 0;

  while (size--) {
    if (write(*buffer++)) n++;
    else break;
  }
  return n;
}

// Allows us to fill the first 8 CGRAM locations
// with custom characters
void createChar(uint8_t location, uint8_t charmap[]) {
  location &= 0x7; // we only have 8 locations 0-7
  command(LCD_SETCGRAMADDR | (location << 3));
  for (int i=0; i<8; i++) {
    write(charmap[i]);
  }
}

/*********** mid level commands, for sending data/cmds */

inline void command(uint8_t value) {
  send(value, GPIO_PIN_RESET);
}

inline size_t write(uint8_t value) {
  send(value, GPIO_PIN_SET);
  return 1; // assume sucess
}

/************ low level data pushing commands **********/

// write either command or data, with automatic 4/8-bit selection
void send(uint8_t value, GPIO_PinState mode) {
  HAL_GPIO_WritePin(_port, _rs_pin, mode);

  // if there is a RW pin indicated, set it low to Write
  if (_rw_pin != 255) {
    HAL_GPIO_WritePin(_port, _rw_pin, GPIO_PIN_RESET);
  }

  if (_displayfunction & LCD_8BITMODE) {
    write8bits(value);
  } else {
    write4bits(value>>4);
    write4bits(value);
  }
}

void pulseEnable(void) {
  HAL_GPIO_WritePin(_port, _enable_pin, GPIO_PIN_RESET);
  HAL_Delay(1);
  HAL_GPIO_WritePin(_port, _enable_pin, GPIO_PIN_SET);
  HAL_Delay(1);    // enable pulse must be >450ns
  HAL_GPIO_WritePin(_port, _enable_pin, GPIO_PIN_RESET);
  HAL_Delay(1);   // commands need > 37us to settle
}

void write4bits(uint8_t value) {
  for (int i = 0; i < 4; i++) {
    HAL_GPIO_WritePin(_port, _data_pins[i], ((value >> i) & 0x01)?GPIO_PIN_SET:GPIO_PIN_RESET);
  }

  pulseEnable();
}

void write8bits(uint8_t value) {
  for (int i = 0; i < 8; i++) {
    HAL_GPIO_WritePin(_port, _data_pins[i], ((value >> i) & 0x01)?GPIO_PIN_SET:GPIO_PIN_RESET);
  }

  pulseEnable();
}
#include "main.h"
#include "LiquidCrystal.h"

int main(void)
{
HAL_Init();
SystemClock_Config();
MX_GPIO_Init();
LiquidCrystal(GPIOB, GPIO_PIN_3,GPIO_PIN_4,GPIO_PIN_5,GPIO_PIN_6 ,GPIO_PIN_7,GPIO_PIN_8,GPIO_PIN_9);
begin(20,4);      //LCD 20*4

while (1)
  {
    setCursor(0, 0);
    print("HELLO WORLD");
    HAL_Delay(1000);
    clear();
  }
}
Proteus Configuration :
- Open Proteus & Create New Project and click next

- Click on Pick Device
- Search for STM32F103C6 & [LCD 16*2… LCD 20*4]
- Click on Terminal Mode then choose (DEFAULT & POWER &GROUND)
- finally make the circuit below and start the simulation

That’s all!
If you have any questions or suggestions don’t hesitate to leave a comment below
