
In this article, we explore how to effectively interface the STM32 microcontroller with the APDS-9005 luminance sensor for improved ambient light detection and power management.
Things used in this project
Software apps and online services:
1- STMicroelectronics STM32CubeMX
2- STMicroelectronics STM32CubeIDE
3- Proteus 8
Interfacing an STM32 Microcontroller with the APDS-9005 Luminance Sensor
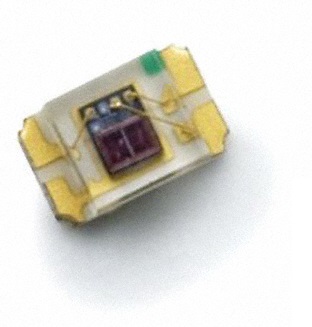
The APDS-9005 is a low-cost ambient light photo sensor that provides an analog output. Packaged in a miniature chipLED lead-free surface mount design, it features a spectral response closely aligned with the CIE standard photopic observer. This sensor is particularly beneficial for applications requiring ambient light measurement to optimize display backlighting, making it ideal for mobile devices, such as smartphones and PDAs, where power consumption is critical. By utilizing the APDS-9005, manufacturers can significantly enhance battery life while providing a comfortable display experience.
Application Support Information
The Application Engineering Group is available to assist with the design and integration of the APDS-9005 ambient light photo sensor module. For further details, you can reach out through your local sales representatives.
Features
- Spectral Responsivity: Closely matches that of the human eye.
- Miniature ChipLED Lead-Free Surface-Mount Package:
- Height: 0.55 mm
- Width: 1.60 mm
- Depth: 1.50 mm
- Low Sensitivity Variation: Consistent performance across various light sources.
- Recommended Operating Temperature: -40°C to 85°C.
- Supply Voltage (Vcc): 1.8V to 5.5V.
- Lead-Free Package: Compliant with RoHS standards.
- Output Linearity: Maintains linear output across a wide illumination range.
Applications
- Display Backlighting Control:
- Mobile Devices: Smartphones, PDAs.
- Computing Devices: Notebooks, Webpads.
- Consumer Electronics: TVs, Video Cameras, Digital Still Cameras.
- Automatic Lighting Management:
- Residential and commercial lighting systems.
- Automotive Applications: Enhancing vehicle interior lighting based on ambient conditions.
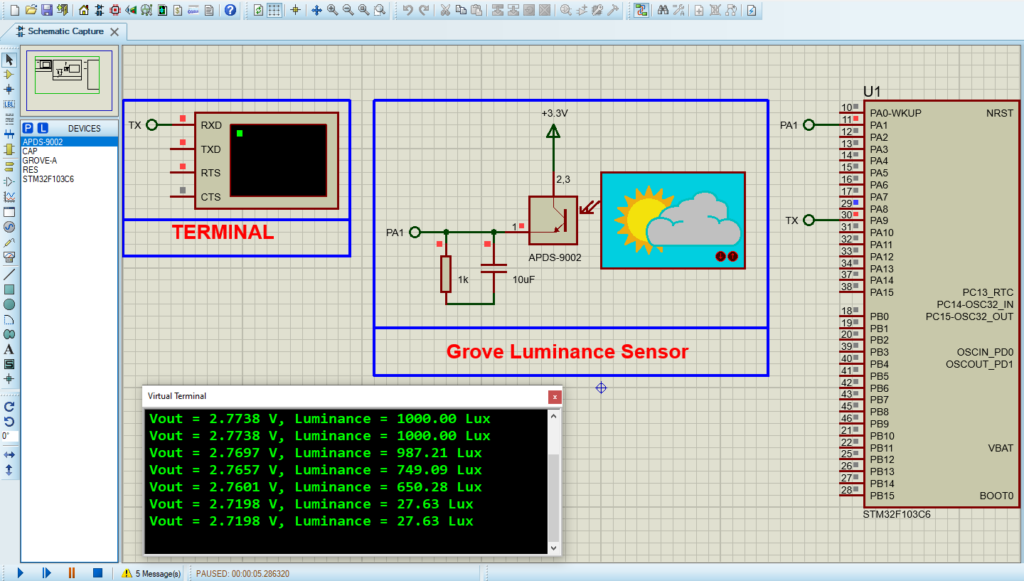
This project demonstrates the integration of an STM32 microcontroller with the APDS-9005 luminance sensor, utilizing ADC for accurate light measurements and UART for efficient data transmission. The code continuously reads ambient light levels, converting analog voltage outputs from the sensor into corresponding luminance values measured in Lux. By employing modular programming and effective mapping functions, this implementation showcases real-time control and monitoring capabilities, making it suitable for applications like automated lighting systems and environmental monitoring.
STM32CubeMX Configuration:
- Open CubeMX & Create New Project Choose The Target MCU STM32F103C6 & Double-Click Its Name
- Go To The Clock Configuration & Set The System Clock To 8MHz
Configuration for the ADC Mode:
- n the Categories tab, select the ADC1 & enable IN1
- In the Parameter settings tab, Enable the Continuous Conversion Mode
Configuration for the UART Mode:
- Enable USART1 Module (Asynchronous Mode)
- Set the USART1 communication parameters (baud rate = 115200, parity=NON, stop bits =1, and word length = 8bits)
- Generate The Initialization Code & Open The Project In CubeIDE
STM32CubeIDE Configuration :
- Write The Application Layer Code
- main.c
/* Includes ------------------------------------------------------------------*/
#include "main.h"

/* Private includes ----------------------------------------------------------*/
/* USER CODE BEGIN Includes */
#include "light_sensor.h"
/* USER CODE END Includes */


/* Private variables ---------------------------------------------------------*/
ADC_HandleTypeDef hadc1;
UART_HandleTypeDef huart1;


/* Private function prototypes -----------------------------------------------*/
void SystemClock_Config(void);
static void MX_GPIO_Init(void);
static void MX_ADC1_Init(void);
static void MX_USART1_UART_Init(void);
/* USER CODE BEGIN PFP */

/**
  * @brief  The application entry point.
  * @retval int
  */
int main(void)
{

  /* Reset of all peripherals, Initializes the Flash interface and the Systick. */
  HAL_Init();
  /* Configure the system clock */
  SystemClock_Config();
  /* Initialize all configured peripherals */
  MX_GPIO_Init();
  MX_ADC1_Init();
  MX_USART1_UART_Init();
  /* USER CODE BEGIN 2 */
  LightSensor_Init(&hadc1, &huart1);
  /* USER CODE END 2 */

  /* USER CODE BEGIN WHILE */
  while (1)
  {
    /* USER CODE END WHILE */
    /* USER CODE BEGIN 3 */
      LightSensor_PrintReadings();
         HAL_Delay(500);
  }
  /* USER CODE END 3 */
}
Proteus Configuration :
- Open Proteus & Create New Project and click next
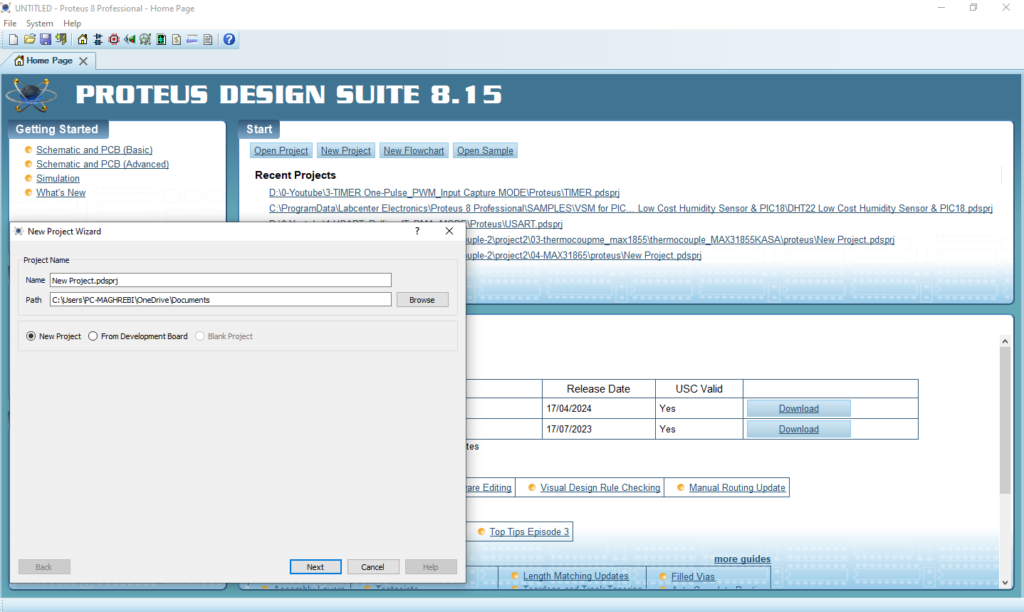
- Click on Pick Device
- Search for STM32F103C6 & ST7735R
- Click on Terminal Mode then choose (DYNAMIC&POWER &GROUND)
- finally make the circuit below and start the simulation
That’s all!
If you have any questions or suggestions don’t hesitate to leave a comment below.