
In this article, we explore how to interface an ultrasonic sensor with the PIC16F877A microcontroller for precise distance measurement.

Interfacing HC-SR04 Ultrasonic Sensor with PIC16F877A: Overview and Project Guide
In this project, we will explore how to interface an ultrasonic sensor with the PIC16F877A microcontroller to achieve accurate distance measurement, perfect for embedded systems requiring reliable proximity sensing.
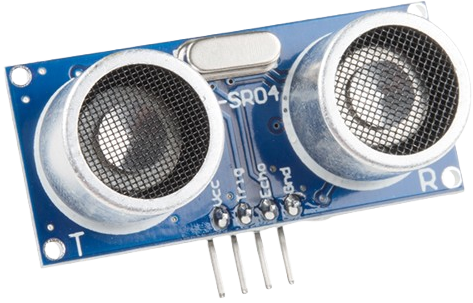
HC-SR04 Ultrasonic Sensor Overview
Ultrasonic ranging module HC-SR04 offers non-contact distance measurement from 2 cm to 400 cm with an accuracy of 3 mm. Featuring ultrasonic transmitters, receivers, and a control circuit, it calculates distances based on the time interval between the transmitted ultrasonic waves and their echoes. Operating at 5V DC, it is highly efficient, compact, and suitable for applications requiring precise and reliable distance sensing.
If you’d like to learn more about this sensor and explore additional projects using other microcontrollers, check out the article STM32 Ultrasonic Sensor.
Project : Interfacing HC-SR04 Ultrasonic Sensor with PIC Microcontroller
This project demonstrates how to interface the HC–SR04 ultrasonic sensor with the PIC16F877A microcontroller to measure distance. The setup uses UART communication to transmit the measured distance to a connected terminal. With its accurate ranging capability, the HC-SR04 is perfect for proximity sensing in embedded systems.
Configuration and Definitions
This section includes the configuration bits, pin definitions, constants, and function prototypes to set up the PIC16F877A microcontroller and ultrasonic sensor.
- #include <xc.h>
- #include <stdint.h>
- #include <stdio.h>
- // Configuration bits
- #pragma config FOSC = HS // High-Speed Crystal
- #pragma config WDTE = OFF // Watchdog Timer disabled
- #pragma config PWRTE = ON // Power-up Timer enabled
- #pragma config BOREN = ON // Brown-out Reset enabled
- #pragma config LVP = OFF // Low Voltage Programming disabled
- #pragma config CPD = OFF // Data EEPROM Memory Code Protection disabled
- #pragma config WRT = OFF // Flash Program Memory Write disabled
- #pragma config CP = OFF // Flash Program Memory Code Protection disabled
- #define _XTAL_FREQ 20000000 // 20 MHz oscillator frequency
- // Pin Definitions
- #define TRIG_PIN RB0 // Trigger pin connected to RB0
- #define ECHO_PIN RB1 // Echo pin connected to RB1
- #define TRIG_PIN_DIR TRISB0 // Direction register for TRIG_PIN
- #define ECHO_PIN_DIR TRISB1 // Direction register for ECHO_PIN
- // Constants
- #define US_ROUNDTRIP_CM 145 // Microseconds for sound to travel 1 cm (adjust for calibration)
- // Function Prototypes
- void initialize_uart(void);
- void uart_send_string(const char* str);
- void uart_send_byte(uint8_t data);
- void initialize_pins(void);
- uint16_t measure_distance(void);
- // UART Buffer
- char uart_buffer[32];
UART Initialization and Communication
This section handles UART initialization and functions for sending data over UART.
- void initialize_uart(void) {
- TRISC6 = 0; // TX pin as output
- TRISC7 = 1; // RX pin as input
- SPBRG = 129; // Baud rate set for 9600 with 20MHz crystal
- BRGH = 1; // High-speed baud rate
- SYNC = 0; // Asynchronous mode
- SPEN = 1; // Enable serial port
- TXEN = 1; // Enable transmission
- CREN = 1; // Enable reception
- }
- void uart_send_byte(uint8_t data) {
- while (!TXIF); // Wait for transmit buffer to be empty
- TXREG = data; // Send the byte
- }
- void uart_send_string(const char* str) {
- while (*str) {
- uart_send_byte(*str++);
- }
- }
Ultrasonic Sensor Initialization and Main Logic
This section includes functions to initialize pins, measure distance, and the main logic for continuous distance measurement.
- void initialize_pins(void) {
- TRIG_PIN_DIR = 0; // Set TRIG_PIN as output
- ECHO_PIN_DIR = 1; // Set ECHO_PIN as input
- TRIG_PIN = 0; // Ensure trigger pin is low initially
- }
- uint16_t measure_distance(void) {
- uint16_t pulse_duration = 0;
- // Generate 10s trigger pulse
- TRIG_PIN = 1;
- __delay_us(10);
- TRIG_PIN = 0;
- // Wait for echo pin to go high
- while (!ECHO_PIN); // Wait for rising edge
- // Start Timer1
- TMR1H = 0;
- TMR1L = 0;
- TMR1ON = 1; // Start Timer1
- // Wait for echo pin to go low
- while (ECHO_PIN); // Wait for falling edge
- // Stop Timer1
- TMR1ON = 0;
- // Calculate pulse duration
- pulse_duration = ((uint16_t)TMR1H << 8) | TMR1L;
- // Convert pulse duration to distance in cm
- return pulse_duration / US_ROUNDTRIP_CM;
- }
- void main(void) {
- uint16_t distance;
- // Initialize peripherals
- initialize_pins();
- initialize_uart();
- // Timer1 configuration
- T1CON = 0x10; // Prescaler 1:2, internal clock (Fosc/4)
- while (1) {
- distance = measure_distance();
- // Send distance over UART
- sprintf(uart_buffer, "Distance: %ucm\r\n", distance);
- uart_send_string(uart_buffer);
- __delay_ms(500); // Delay before next measurement
- }
- }
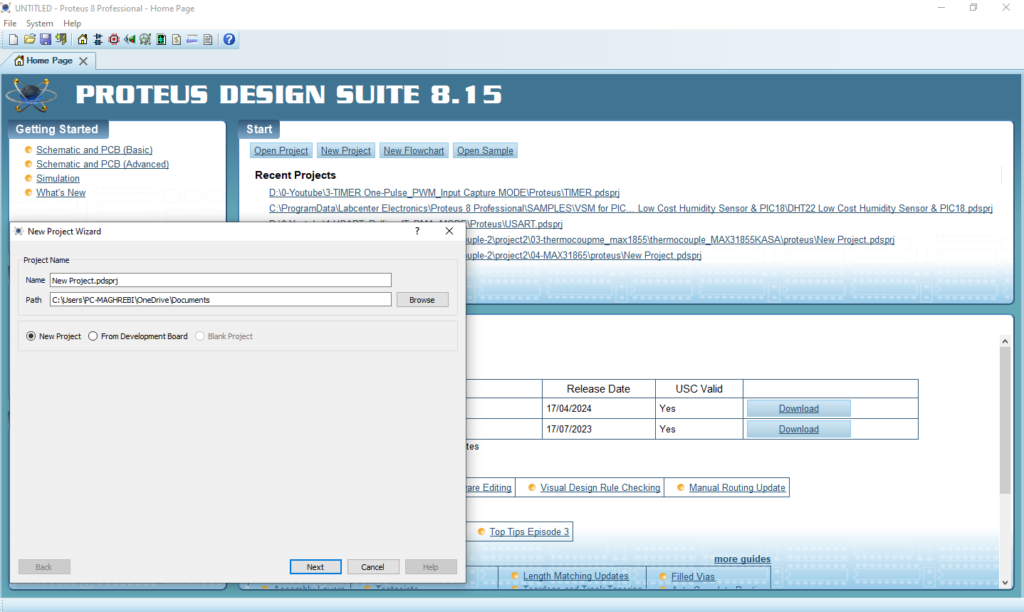
Proteus Configuration :
- Open Proteus & Create New Project and click next
- Click on Pick Device
- Search for PIC16F877A & SRF04
- Click on Virtual Instruments Mode then choose VIRTUAL TERMINAL & OSCILLOSCOPE
- Click on Terminal Mode then choose (DEFAULT & POWER & GROUND)
- finally make the circuit below and start the simulation
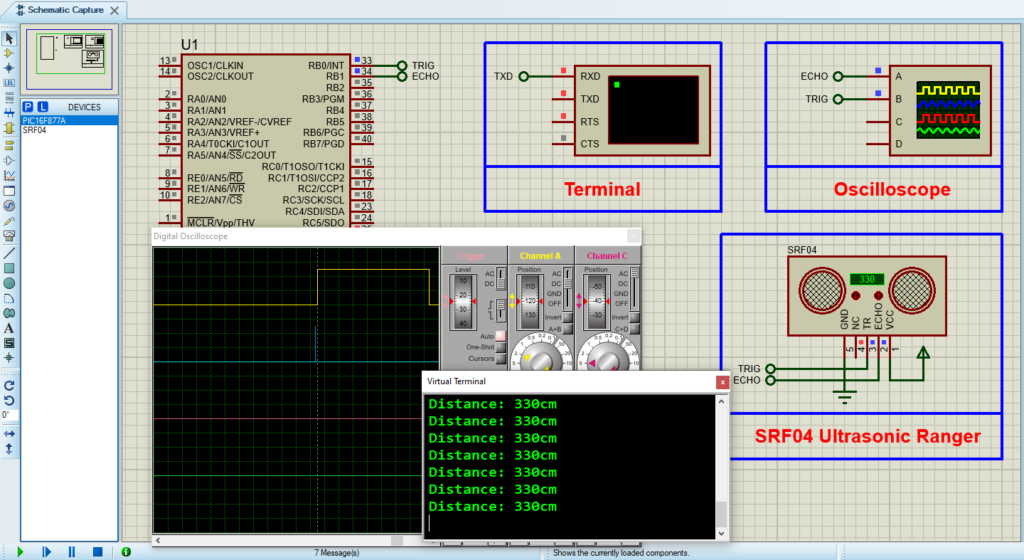
That’s all!
If you have any questions or suggestions don’t hesitate to leave a comment below