In this article, we explore how to interface the PIC16F877A LM335 & AD592 Temperature Sensor for precise and efficient temperature monitoring applications.
Interfacing LM335 and AD592 Temperature Sensors with PIC16F877A Microcontroller: A Comprehensive Guide
In this project, we will explore how to interface the LM335 and AD592 temperature sensors with the PIC16F877A microcontroller. The PIC16F877A LM335 & AD592 Temperature Sensor project demonstrates the capability of these sensors to provide accurate temperature measurements, making them ideal for a wide range of embedded system applications.
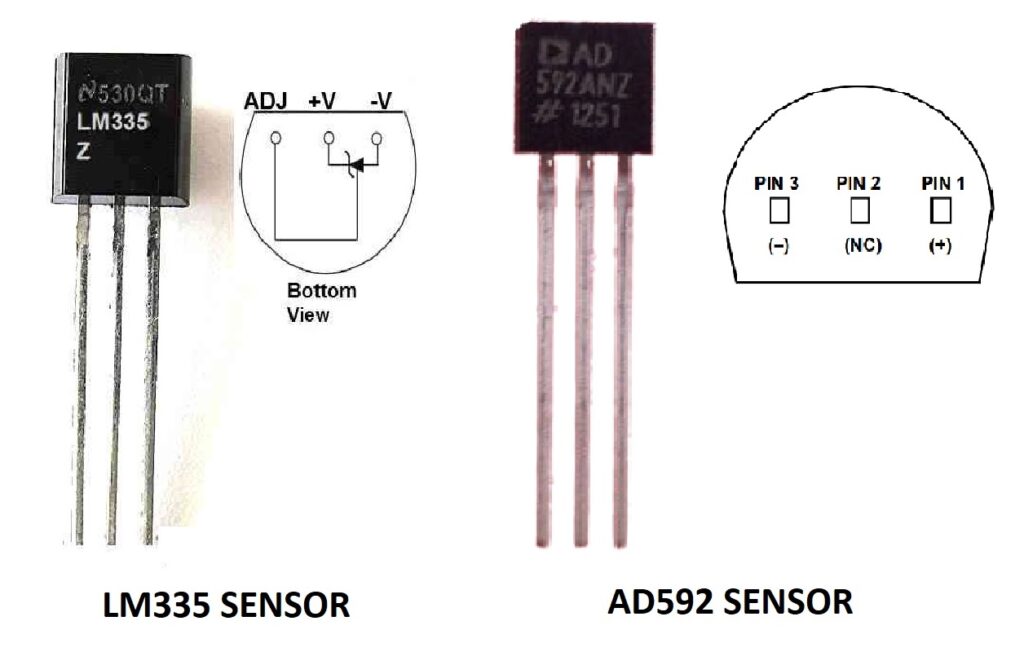
LM335 Temperature Sensor Overview
The LM335 is a precision temperature sensor calibrated to provide a linear output proportional to absolute temperature (Kelvin scale). It operates as a 2-terminal Zener diode with a voltage breakdown directly proportional to the temperature in Kelvin.

Key Features
- Calibrated to Kelvin temperature with a scale of 10 mV/°K.
- High accuracy: ±1°C (uncalibrated) over a wide range.
- Low dynamic impedance (<1 Ω).
- Operating range: -40°C to 100°C.
- Calibration option for improved accuracy..
Temperature Calibration Using ADJ Pin
The LM135/LM335 includes a simple method for calibrating the device for higher accuracy using a potentiometer connected to the adjustment terminal. This allows for a one-point calibration that corrects inaccuracies across the full temperature range.
- Calibration ensures that the output is proportional to absolute temperature (0 V at 0 K or -273.15°C).
- Errors are corrected at a single temperature, ensuring accurate readings across all temperatures.
- Standard calibration is set to 2.982V at 25°C, with an output scale of 10 mV/K.
Applications
- Industrial temperature sensing.
- HVAC systems.
- Battery management.
AD592 Temperature Sensor Overview
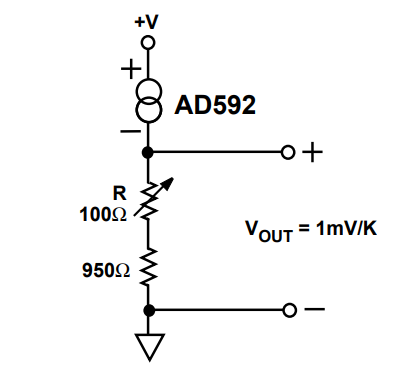
The AD592 is a monolithic temperature transducer providing an output current proportional to absolute temperature. It features excellent accuracy, stability, and linearity, making it suitable for a variety of sensing applications.
Key Features
- High accuracy: ±0.5°C at 25°C.
- Operating range: -25°C to +105°C.
- High linearity: ±0.15°C max (0°C to +70°C).
- Current output: 1 µA/K, simplifying signal processing.
- Robust against noise and voltage drops.
Calibration, Accuracy, and Linearity
- Calibration accuracy is specified at 25°C, with error limits extending from 0°C to 70°C and -25°C to 105°C.
- The AD592 provides a highly linear output compared to older technologies like thermistors and RTDs. Nonlinearity errors, which cannot be trimmed, are minimal.
- For improved accuracy, calibration can be performed using a single temperature trim or a two-temperature trim for advanced applications.
Applications
- Remote sensing applications.
- Industrial temperature controls.
- Thermocouple cold junction compensation.
Interfacing LM335 and AD592 Temperature Sensors with LCD Display Using PIC16F877A
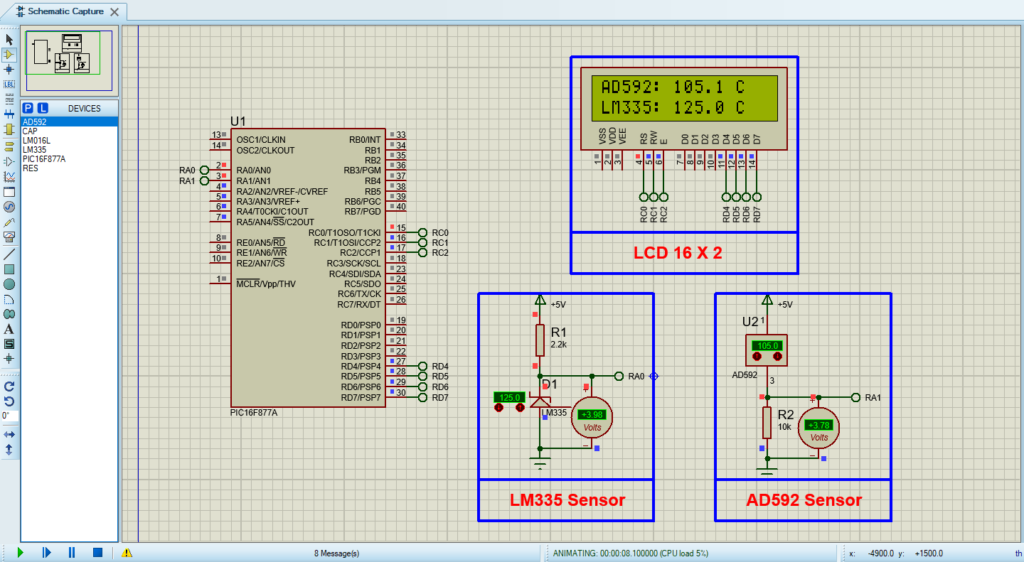
This project demonstrates the interfacing of the LM335 and AD592 temperature sensors with a PIC16F877A microcontroller. The ADC module is used to read analog data from both sensors, which is then processed and displayed on a 16×2 LCD. The system continuously updates the display with the temperature values, showcasing the integration of analog sensors, ADC, and LCD output in an embedded system.
Sensor Driver Header: ADC
This header file provides the function prototypes for configuring and using the ADC module of the PIC16F877A. These functions enable analog-to-digital conversion for temperature readings from the LM335 and AD592 sensors.
#ifndef ADC_H
#define ADC_H

#include "main.h"

// Function Prototypes
void configure_ADC(void);
void select_ADC_channel(unsigned char channel);
void start_ADC_conversion(void);
void wait_for_conversion(void);
uint16_t read_ADC_result(void);

#endif /* ADC_H */
LCD Driver Header
The LCD header file defines the necessary functions and pins for controlling a 16×2 LCD display. It includes functions for initialization, sending data, and displaying strings.
#ifndef LCD_H
#define LCD_H

#include "main.h"

// LCD control pins (customizable based on the hardware)
#define RS PORTCbits.RC0
#define RW PORTCbits.RC1
#define EN PORTCbits.RC2

// Function Prototypes
void lcd_initialize(void);
void lcd_data(unsigned char data);
void lcd_string(const unsigned char *str, unsigned char len);
void lcd_command(unsigned char cmd);

#endif /* LCD_H */
Sensor Data Processing and Display
The code reads analog values from the LM335 and AD592 sensors, converts them into temperature values, and displays the results on the LCD. The first row shows the temperature from the AD592 sensor, and the second row displays the LM335 sensor data.
#include "main.h"
#include "adc.h"
#include "lcd.h"
#include <math.h>

// Temperature variables
float Celsius_AD592, Celsius_LM335;

// Main function
void main(void) {
    lcd_initialize();
    configure_ADC();

    while (1) {
        __delay_ms(2000); // 2-second delay
        read_AD592_temperature();
        read_LM335_temperature();
        display_temperatures();
    }
}

// Reading temperature from LM335
void read_LM335_temperature(void) {
    select_ADC_channel(0); // LM335 on AN0
    start_ADC_conversion();
    wait_for_conversion();
    float Kelvin = read_ADC_result() * 0.489; // Convert ADC to Kelvin
    Celsius_LM335 = Kelvin - 273;            // Kelvin to Celsius
}

// Reading temperature from AD592
void read_AD592_temperature(void) {
    select_ADC_channel(1); // AD592 on AN1
    start_ADC_conversion();
    wait_for_conversion();
    float voltage = read_ADC_result() * (5.0 / 1023.0); // ADC to voltage
    float Kelvin = voltage / 0.01;                      // Voltage to Kelvin
    Celsius_AD592 = Kelvin - 273.15;                    // Kelvin to Celsius
}

// Displaying temperatures on the LCD
void display_temperatures(void) {
    char message1[16], message2[16];
    sprintf(message1, "AD592: %2.1f C", Celsius_AD592);
    sprintf(message2, "LM335: %2.1f C", Celsius_LM335);
    lcd_command(0x80); // LCD first row
    lcd_string((const unsigned char *)message1, sizeof(message1));
    lcd_command(0xC0); // LCD second row
    lcd_string((const unsigned char *)message2, sizeof(message2));
}
Proteus Configuration :
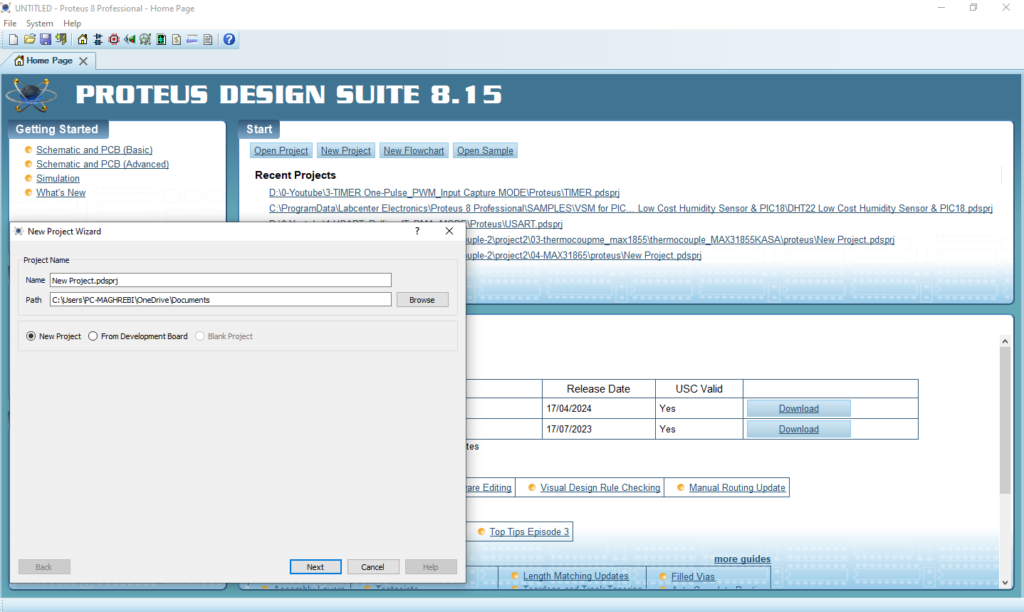
- Open Proteus & Create New Project and click next
- Click on Pick Device
- Search for PIC16F877A & LCD 16×2 & LM335 & AD592
- Click on Terminal Mode then choose (DEFAULT & POWER &GROUND)
- finally make the circuit below and start the simulation
That’s all!
If you have any questions or suggestions don’t hesitate to leave a comment below

1 comment
[…] In this project, we will explore how to interface the TC1047 and MCP9700 low-power temperature sensors with the PIC16F877A microcontroller. The PIC16F877A TC1047 & MCP9700 project highlights the efficiency and precision of these sensors, making them suitable for a variety of embedded system applications. If you want to see another similar temperature sensor project, check out “PIC16F877A LM335 & AD592 Temperature Sensor.” […]