In this article, explore how to interface the PIC16F877A with the BMP180 sensor for accurate temperature and pressure measurement.
Interfacing the PIC16F877A Microcontroller with the BMP180 Sensor for Accurate Temperature and Pressure Measurements
In this project, we will explore how to interface the PIC16F877A microcontroller with the BMP180 sensor for precise temperature and pressure measurement. For similar projects, check out our “PIC16F877A I2C MPL3115A2 Sensor Interface.”
BMP180 Overview
The BMP180 is a high-precision digital pressure sensor designed by Bosch Sensortec. It is the successor to the BMP085 and offers exceptional performance with ultra-low power consumption, making it ideal for use in mobile devices, GPS navigation systems, and outdoor equipment. Built on piezo-resistive technology, it provides accurate pressure and temperature measurements, with low noise levels and high EMC robustness. The BMP180 uses an I2C interface for easy integration and features on-chip calibration for hassle-free implementation.
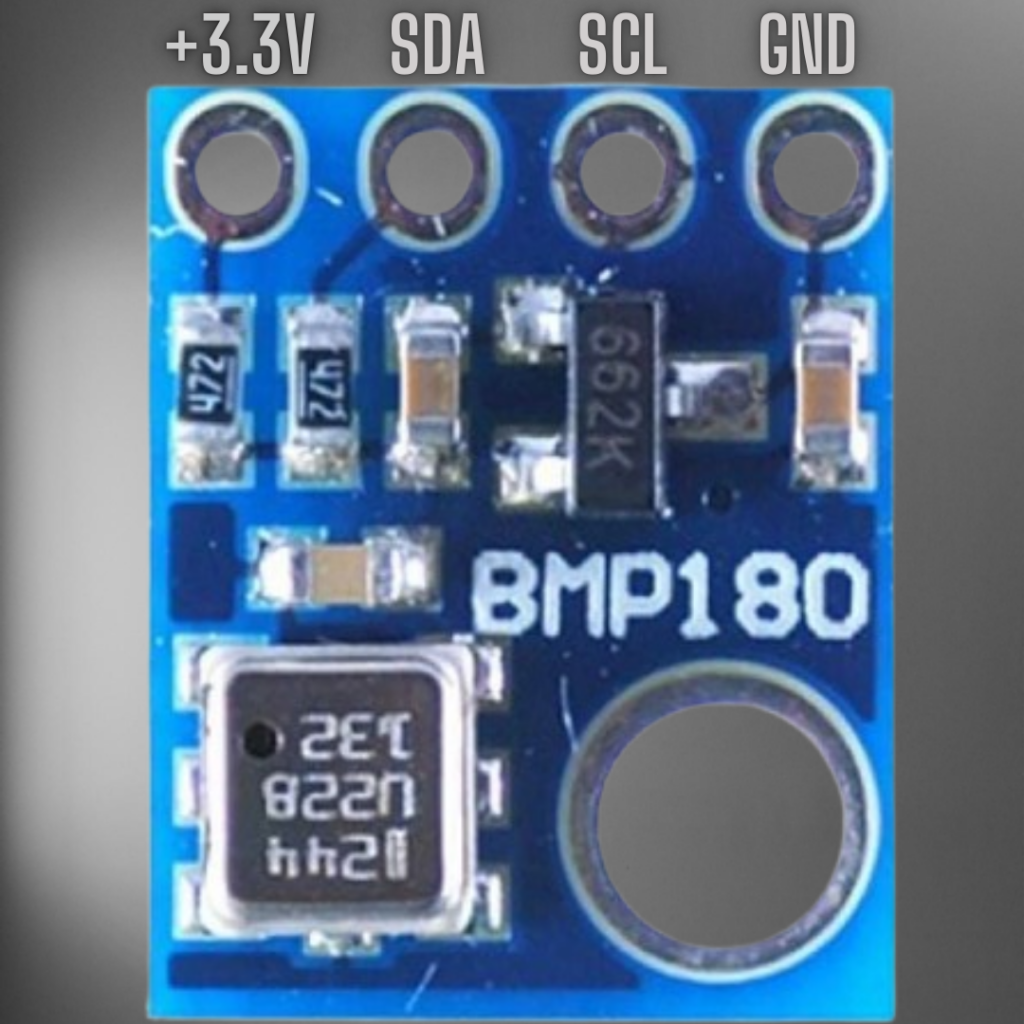
BMP180 Features and Applications
Features:
- Pressure Range: 300 to 1100 hPa, suitable for altitudes from -500m to +9000m.
- Temperature Measurement: Integrated for added functionality.
- Low Power Consumption: Operates at 5 µA in standard mode at 1 sample/second.
- High Accuracy: Pressure resolution up to 0.01 hPa and temperature accuracy of ±0.5°C.
- Compact Design: LGA package measuring 3.6mm x 3.8mm x 0.93mm.
- Interfaces: I2C for communication with microcontrollers.
- Environment-Friendly: Pb-free, RoHS compliant, and halogen-free.
Applications:
- GPS navigation for altitude correction and dead reckoning.
- Weather forecasting systems.
- Indoor and outdoor navigation.
- Sports and fitness tracking.
- Vertical velocity indicators.
BMP180 Block Diagram
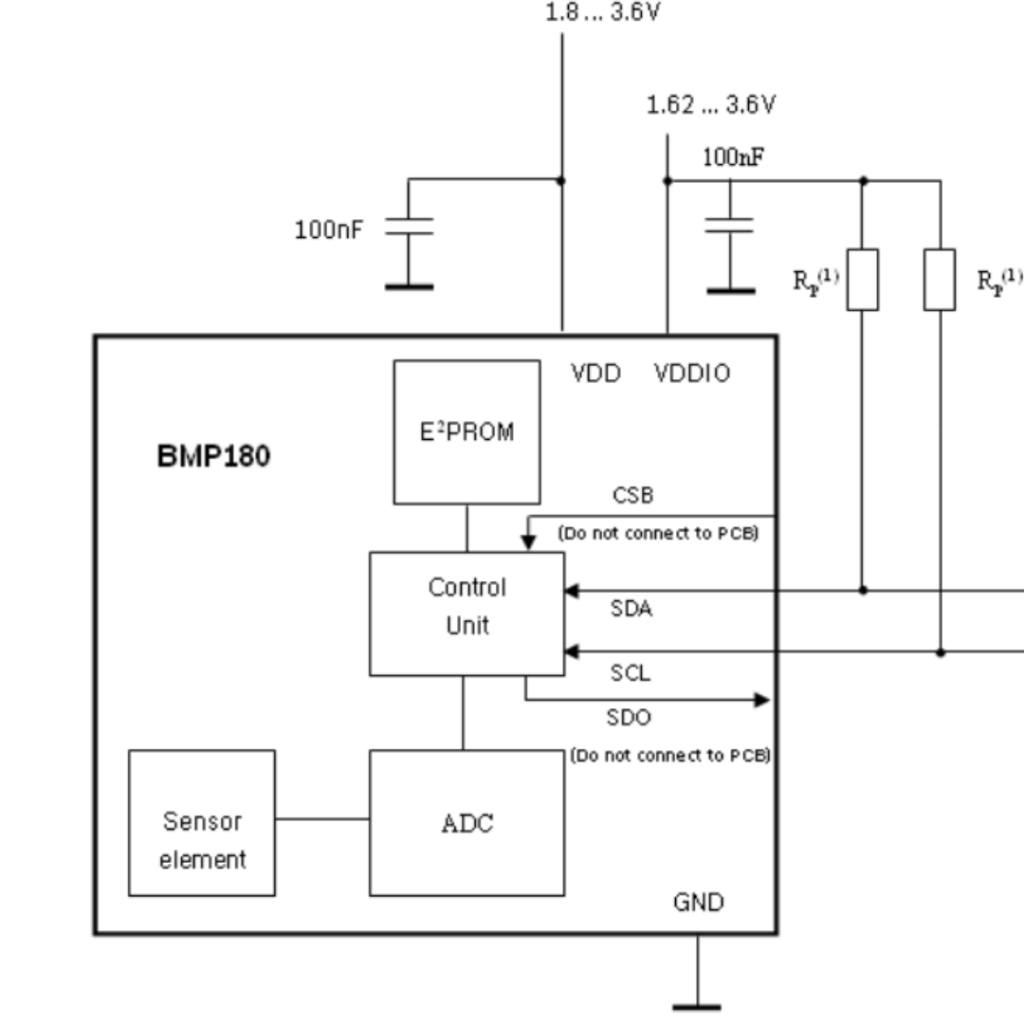
The BMP180 consists of several functional blocks:
- Piezo-Resistive Sensor: Detects changes in atmospheric pressure.
Analog-to-Digital Converter (ADC): Converts the sensor signals into digital values. - Control Unit: Manages operation and processes data.
- EEPROM: Stores calibration coefficients for compensation.
- I2C Interface: Enables communication with host devices.
The block diagram illustrates the flow of data from the sensor to the control unit and onward to the microcontroller via the I2C interface.
Calibration and Measurement
The BMP180 includes a 176-bit EEPROM that stores unique calibration coefficients for each sensor. These coefficients are used to correct for offset, temperature dependencies, and other sensor-specific parameters, ensuring highly accurate measurements. The sensor supports multiple sampling modes (e.g., ultra-low power, standard, high resolution, ultra-high resolution) to balance power consumption, speed, and accuracy. Additionally, the BMP180 provides algorithms for calculating absolute altitude and pressure at sea level, enhancing its utility in navigation and environmental monitoring applications.
Project: Interfacing BMP180 Sensor with PIC16F877A for Temperature and Pressure Monitoring
This project demonstrates interfacing the BMP180 I2C digital pressure sensor with the PIC16F877A microcontroller. The system initializes the BMP180 in ultra-high-resolution mode to capture precise environmental data. It continuously measures atmospheric pressure, processes the raw data, and displays the readings in real time on an LCD. The implementation ensures reliable environmental monitoring, making it ideal for embedded applications requiring accurate pressure measurement and future scalability for temperature monitoring.
I2C Driver Header File (i2c.h)
This file contains the core functions for I2C communication between the PIC16F877A microcontroller and the BMP180 sensor.
// I2C.h
#ifndef I2C_H
#define I2C_H

#include <xc.h>
#include <math.h>
#include <stdint.h>
#include <stdio.h>  // For sprintf
#define _XTAL_FREQ             16000000
#define I2C_BaudRate           100000
#define SCL_D                  TRISC3
#define SDA_D                  TRISC4

// Function prototypes
void I2C_Master_Init(void);
void I2C_Master_Wait(void);
void I2C_Master_Start(void);
void I2C_Master_RepeatedStart(void);
void I2C_Master_Stop(void);
void I2C_ACK(void);
void I2C_NACK(void);
unsigned char I2C_Master_Write(unsigned char data);
unsigned char I2C_Read_Byte(void);

#endif
LCD Driver Header File (lcd.h)
This file defines functions for controlling an LCD display using parallel communication. It includes initialization, sending data, sending strings, and sending commands to the LCD
#ifndef LCD_H
#define LCD_H

#include"i2c.h"

// Define LCD control pins (adjust these based on your hardware setup)
#define RS PORTCbits.RC0  // Register Select pin
#define RW PORTCbits.RC1  // Read/Write pin
#define EN PORTCbits.RC2  // Enable pin

// Function Prototypes
void lcd_initialize(void);
void lcd_data(unsigned char data);
void lcd_string(const unsigned char *str, unsigned char len);
void lcd_command(unsigned char cmd);

#endif /* LCD_H */
BMP085 or BMP180 Sensor Driver Header File (BMP085.h)
The BMP085 driver provides functions to initialize the sensor, read raw temperature and pressure values, compute compensated readings, and interact with calibration registers.
#ifndef BMP085_H
#define BMP085_H

#include "i2c.h"
// Declare global/static variables
static int16_t ac1, ac2, ac3, b1, b2, mb, mc, md;
static uint16_t ac4, ac5, ac6;
static uint8_t oversampling = 3;


// I2C address for BMP085
#define BMP085_I2CADDR 0x77

// Calibration register addresses
#define BMP085_CAL_AC1 0xAA
#define BMP085_CAL_AC2 0xAC
#define BMP085_CAL_AC3 0xAE
#define BMP085_CAL_AC4 0xB0
#define BMP085_CAL_AC5 0xB2
#define BMP085_CAL_AC6 0xB4
#define BMP085_CAL_B1  0xB6
#define BMP085_CAL_B2  0xB8
#define BMP085_CAL_MB  0xBA
#define BMP085_CAL_MC  0xBC
#define BMP085_CAL_MD  0xBE

// Control register and commands
#define BMP085_CONTROL         0xF4
#define BMP085_TEMPDATA        0xF6
#define BMP085_PRESSUREDATA    0xF6
#define BMP085_READTEMPCMD     0x2E
#define BMP085_READPRESSURECMD 0x34
#define chip_id                0xD0 // use BMP085_Read8 function result should be 0x55
// Function prototypes
void     BMP085_Write8(uint8_t addr, uint8_t data);
uint8_t  BMP085_Read8(uint8_t addr);
uint16_t BMP085_Read16(uint8_t addr);
int32_t  BMP085_ComputeB5(int32_t UT);

void     BMP085_Init(uint8_t mode);
float    BMP085_ReadTemperature(void);

uint16_t BMP085_ReadRawTemperature(void);
uint32_t BMP085_ReadRawPressure(void);
int32_t  BMP085_ReadPressure(void);

#endif // BMP085_H
Main Application File (main.c)
The main application integrates the BMP180 sensor with the microcontroller, initializing the LCD and sensor, and displaying the pressure readings on the LCD screen.
#include "i2c.h"
#include "BMP085.h"
#include "lcd.h"


void main(void) {
    // Initialize LCD and BMP085
    lcd_initialize();
    BMP085_Init(3); // Ultra High-Res Mode

    while (1) {
        char buffer[16];
        // Format and display MCP9700 temperature
        float temperature = BMP085_ReadTemperature();
        sprintf(buffer, "Temp = %.2f*C", temperature);
        lcd_command(0x80); // Move to first line
        lcd_string((const unsigned char *)buffer, sizeof(buffer));

        int32_t pressure = (BMP085_ReadPressure()/100); // /100 to convert to hpa
        sprintf(buffer, "Pres = %ldhPa", pressure);
        lcd_command(0xC0); // Move to second line
        lcd_string((const unsigned char *)buffer, sizeof(buffer));
        __delay_ms(500);
        }
    }
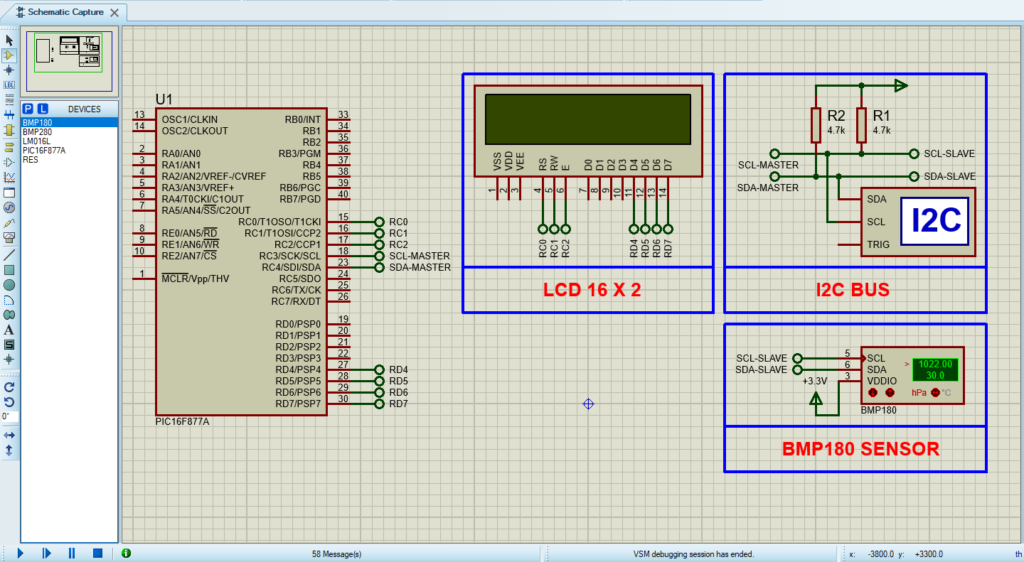
Proteus Configuration :
- Open Proteus & Create New Project and click next
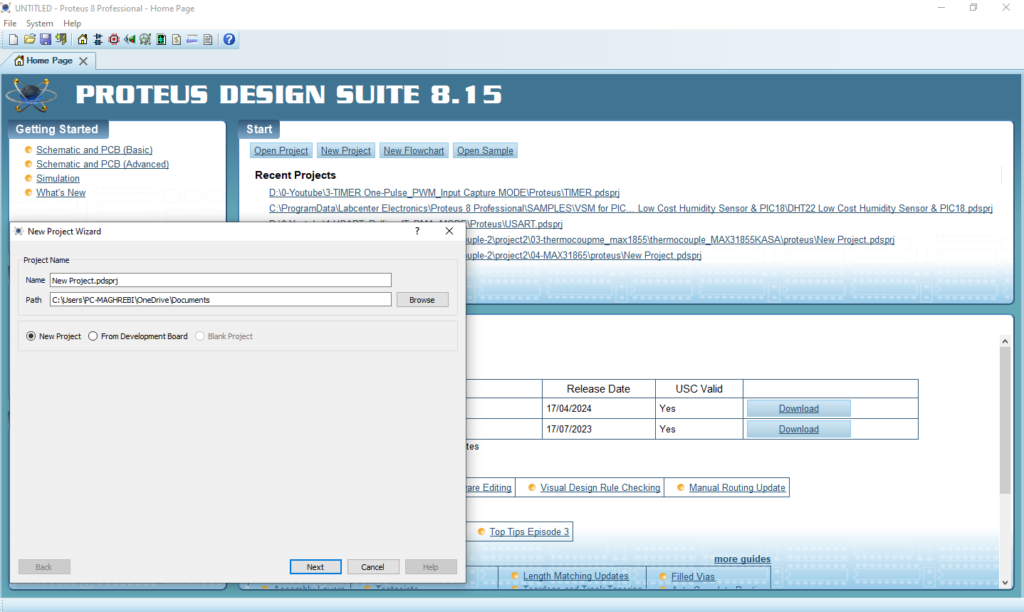
- Click on Pick Device
- Search for PIC16F877A & LCD 16×2 & BMP180 & RESISTOR
- Click on Virtual Instruments Mode then choose I2C DEBUGGER

- Click on Terminal Mode then choose (DEFAULT & POWER &GROUND)
- finally make the circuit below and start the simulation
That’s all!
If you have any questions or suggestions don’t hesitate to leave a comment below

2 comments
[…] readings for various environmental applications. For instance, similar projects like the “ PIC16F877A I2C BMP180 Sensor ” showcase the versatility of such […]
[…] alternative pressure and temperature sensing, consider the BMP180, a digital barometric sensor that measures both pressure and […]