In this article, we will explore using LM20 and LM35 Temperature Sensors with the PIC16F877 microcontroller for accurate temperature measurement applications.

Interfacing LM35 Temperature Sensor with PIC16F877A Microcontroller for Temperature Monitoring Applications
In this project, we will explore how to interface the LM20 and LM35 temperature sensors with a PIC16F877A microcontroller. Temperature sensors are essential in various applications, from simple environmental monitoring to complex industrial control systems.
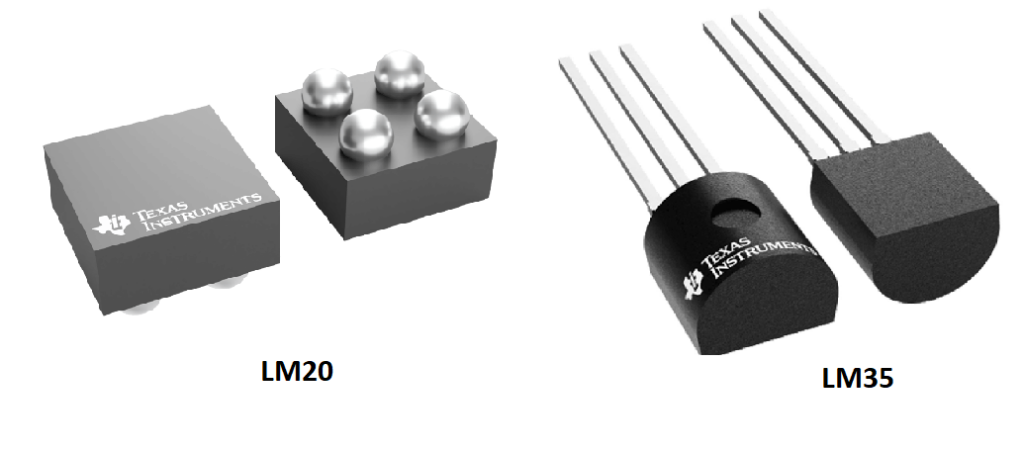
LM35 Temperature Sensor Overview
High-precision integrated temperature sensor with direct Celsius output Versatile, accurate, and cost-effective solution for temperature monitoring applications
Core Specifications
- Operating Range: -55°C to 150°C
- Supply Voltage: 4V to 30V
- Current Draw: <60μA
- Output Scale: +10mV/°C (linear)
Accuracy & Performance
- Room Temperature (25°C): ±0.25°C
- Full Range: ±0.75°C
- Self-heating Effect: 0.08°C in still air
- Non-linearity: ±0.25°C typical
Key Features
- Direct Celsius reading output
- No calibration required
- Works with single/split power supplies
- Low output impedance (0.1Ω at 1mA load)
- Wafer-level trimmed for cost efficiency
Package Options
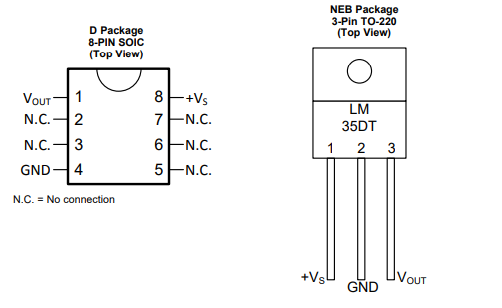
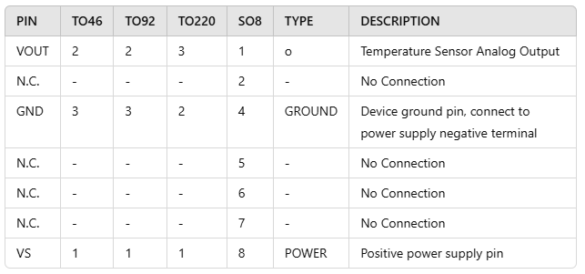
- TO-46
- TO-92
- TO-220
- SO-8
Common Applications
- Power Supply Monitoring
- Battery Management Systems
- HVAC Equipment
- Home Appliances
- Industrial Temperature Control
- Remote Sensing Systems
Implementation Benefits
- Plug-and-play operation
- No Kelvin conversion needed
- Simple voltage scaling
- Easy system integration
- Suitable for remote applications
LM20 Temperature Sensor Overview
High-precision temperature sensor with ultra-low power consumption
Ideal for battery-powered and portable applications requiring minimal power draw
Core Specifications
- Temperature Range: -55°C to 130°C*
- Supply Voltage: 2.4V to 5.5V
- Current Draw: <10μA
- Output Impedance: 160Ω max
- Load Regulation: -2.5mV max (0-16μA)
Accuracy & Performance
- At 30°C: ±1.5°C to ±4°C
- At Range Extremes (130°C/-55°C): ±2.5°C to ±5°C
- Self-heating Effect: <0.02°C in still air
- Non-linearity: ±0.4% typical
- Parabolic Output Characteristics
Package Options
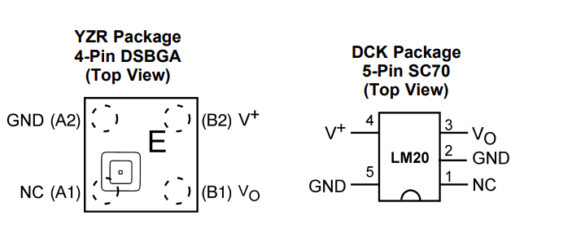
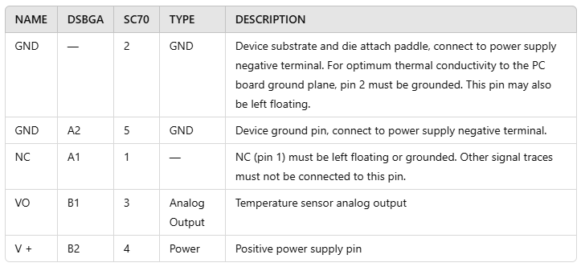
- SC70
- DSBGA
Key Features
- Predictable parabolic transfer function
- No shutdown mode needed
- Direct logic interface compatibility
- Low current consumption
- *Note: -30°C to 130°C range when powered at 2.4V
Common Applications
- Cellular Phones
- Computing Systems
- Power Supply Modules
- Battery Management
- HVAC Systems
- Disk Drives
Implementation Benefits
- Ultra-low power operation
- Minimal self-heating
- Suitable for remote sensing
- Battery-friendly design
- Versatile integration option
Dual Sensor Temperature Monitoring System with PIC16F877A
This project demonstrates interfacing multiple analog temperature sensors (LM20 and LM35) with a PIC16F877A microcontroller. Using the ADC functionality, it reads temperature data from each sensor, processes it, and displays it over UART. The LM20 and LM35 sensors are connected to separate analog channels, enabling independent temperature measurements for each sensor type.
Configuration and Initialization
This section configures the microcontroller’s ports, sets the ADC parameters for reading analog values, and initializes UART communication to display the temperature readings. The configuration bits define the PIC16F877A’s oscillator and other settings for proper operation, while the Initialize_ADC function prepares the ADC for channel-based sensor readings.
#include <xc.h>
#include <stdio.h>
#include <math.h>
#include "uart.h"

// Configuration bits
#pragma config FOSC = HS        // High-Speed Oscillator
#pragma config WDTE = OFF       // Watchdog Timer disabled
#pragma config PWRTE = ON       // Power-up Timer enabled
#pragma config BOREN = ON       // Brown-out Reset enabled
#pragma config LVP = OFF        // Low Voltage Programming disabled
#pragma config CPD = OFF        // Data EEPROM Memory Code Protection disabled
#pragma config WRT = OFF        // Flash Program Memory Write disabled
#pragma config CP = OFF         // Flash Program Memory Code Protection disabled

#define _XTAL_FREQ 8000000     // 8MHz Crystal
#define VREF 5.0f              // Reference voltage

// Function prototypes
void Initialize_ADC(void);
unsigned int Read_ADC(unsigned char channel);
float Convert_To_Temperature_LM20(unsigned int adc_value);
float Convert_To_Temperature_LM35(unsigned int adc_value);
void Display_Temperature(const char* sensor_name, float temperature);

// Initialize ADC for multiple channels
void Initialize_ADC(void) {
    TRISA = 0x03;     // Set RA0 and RA1 as input (binary: 0000 0011)
    ADCON1 = 0x8E;    // Configure AN0 and AN1 as analog, others digital
    ADCON0 = 0x41;    // ADC ON, Channel 0, Fosc/16

    __delay_ms(10);   // Wait for ADC to stabilize
}

// Read ADC value from specified channel
unsigned int Read_ADC(unsigned char channel) {
    ADCON0bits.CHS = channel;    // Select ADC channel
    __delay_ms(2);               // Wait for channel to set up
    ADCON0bits.GO = 1;           // Start conversion
    while(ADCON0bits.GO_nDONE);  // Wait for conversion to complete
    return (ADRESH << 8) + ADRESL;
}
Temperature Calculation and Display
This section calculates temperatures from ADC readings for each sensor type (LM20 and LM35), converts the ADC value to a Celsius temperature, and displays the results using UART. Each sensor has a dedicated function for temperature conversion based on its output characteristics.
// Convert ADC value to temperature for LM20
float Convert_To_Temperature_LM20(unsigned int adc_value) {
    float Vo = ((float)adc_value * VREF) / 1023.0f;
    float temp = -1481.96f + sqrtf(2.1962e6f + ((1.8639f - Vo) / (3.88e-6f)));
    return temp;
}

// Convert ADC value to temperature for LM35
float Convert_To_Temperature_LM35(unsigned int adc_value) {
    float Vo = ((float)adc_value * VREF) / 1023.0f;
    float temp = Vo * 100.0f;  // LM35 outputs 10mV per °C, so multiply by 100
    return temp;
}

// Display temperature function implementation
void Display_Temperature(const char* sensor_name, float temperature) {
    char buffer[50];
    sprintf(buffer, "%s Temperature: %.2f°C\n\r", sensor_name, temperature);
    UART_Write_Text(buffer);
}

// Main function
void main(void) {
    unsigned int adc_value_LM20, adc_value_LM35;
    float temperature_LM20, temperature_LM35;

    Initialize_ADC();
    UART_TX_Init();

    while(1) {
        // Read temperature from LM20 (connected to AN0)
        adc_value_LM20 = Read_ADC(0);  // Channel 0 for LM20
        temperature_LM20 = Convert_To_Temperature_LM20(adc_value_LM20);
        Display_Temperature("LM20", temperature_LM20);

        // Read temperature from LM35 (connected to AN1)
        adc_value_LM35 = Read_ADC(1);  // Channel 1 for LM35
        temperature_LM35 = Convert_To_Temperature_LM35(adc_value_LM35);
        Display_Temperature("LM35", temperature_LM35);

        UART_Write_Text("----------------------------\n\r");

        __delay_ms(1000);  // Wait before next reading
    }
}
Proteus Configuration :
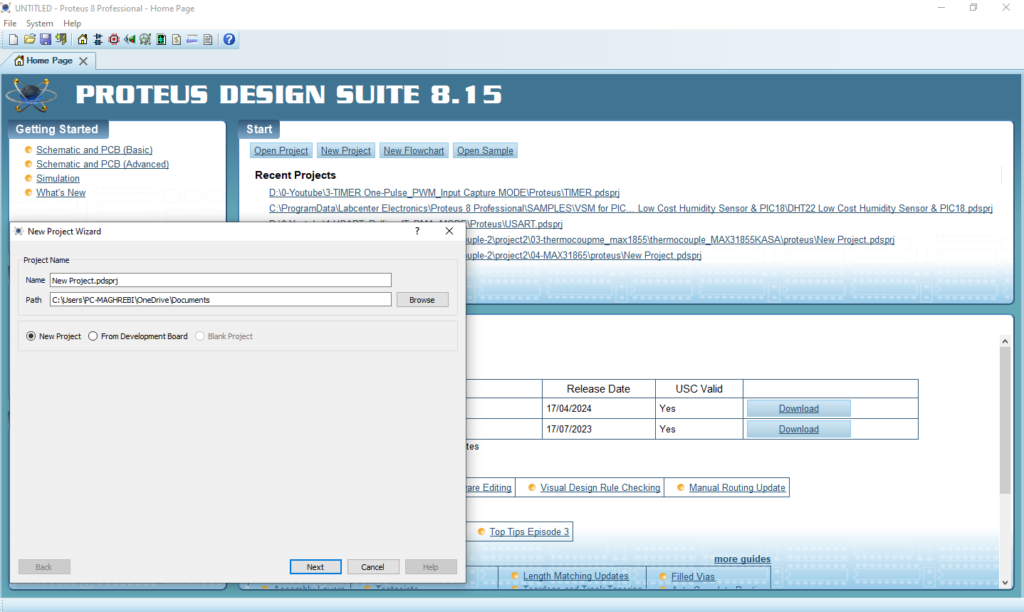
- Open Proteus & Create New Project and click next
- Click on Pick Device
- Search for PIC16F877A & LM20 & LM35
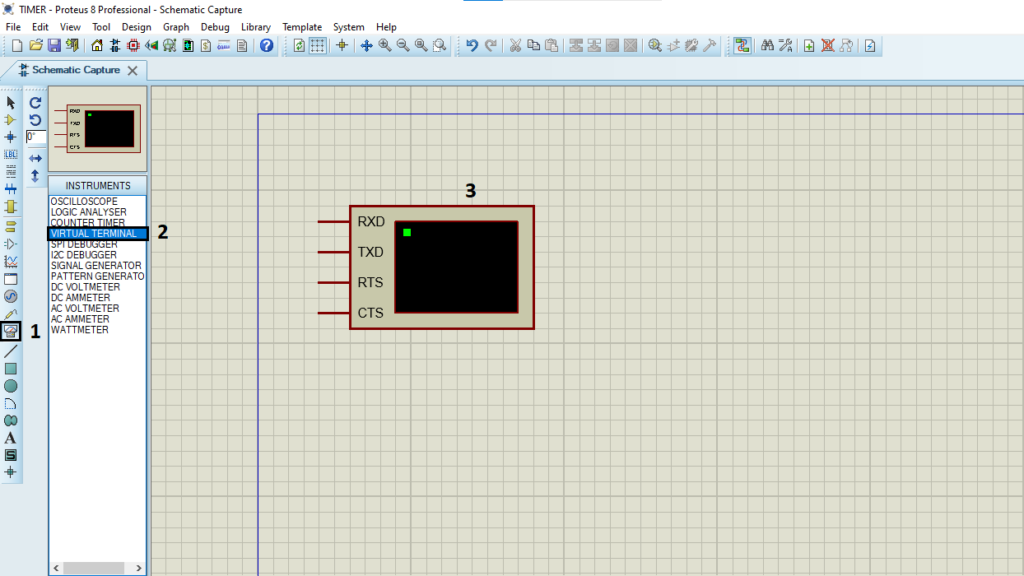
- Click on Virtual Instruments Mode then choose TERMINAL
- Click on Terminal Mode then choose (DEFAULT & POWER &GROUND)
- finally make the circuit below and start the simulation
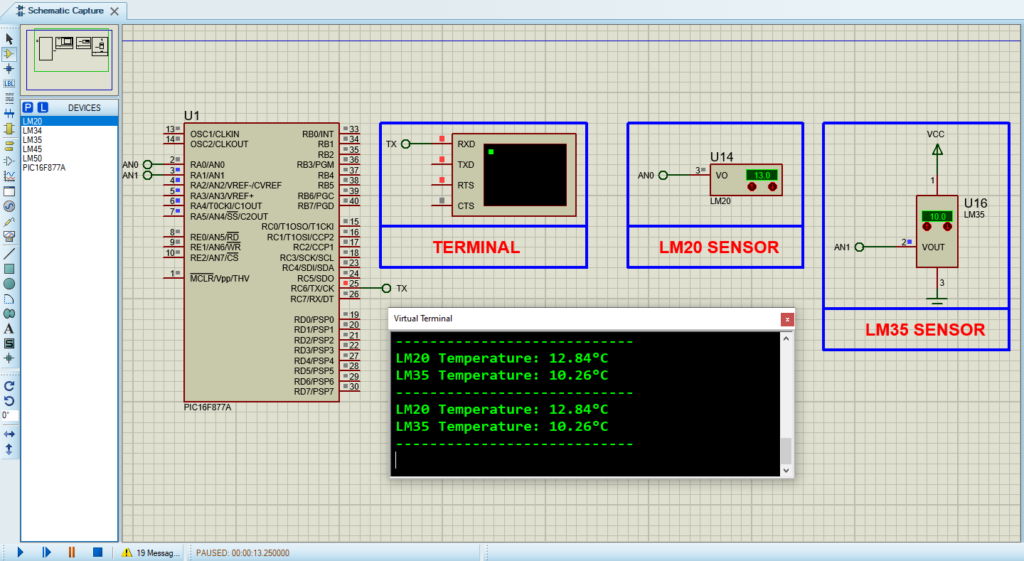
That’s all!
If you have any questions or suggestions don’t hesitate to leave a comment below

1 comment
[…] TMP36 is functionally compatible with other popular temperature sensors like the LM35, and it is often used in temperature monitoring systems that require precise readings, such as in […]