In this article, we explore how to interface the JHD-2X16-I2C LCD with the PIC16F877 microcontroller, leveraging the HD44780 controller for seamless communication.
Integrating an HD44780 I2C LCD Display with the PIC16F877 Microcontroller
Liquid crystal displays (LCDs) are essential in modern embedded systems, providing a simple and clear way to display alphanumeric and symbolic data. Among the widely used LCD modules is the JHD-2X16-I2C, powered by the HD44780 controller. This project explores interfacing the JHD-2X16-I2C with a microcontroller, highlighting efficient utilization of its robust features for seamless data visualization.
For those interested in alternative I2C-based LCD interfaces, I have also written an article detailing the use of the PCF8574 I/O expander to simplify LCD connectivity.
HD44780 Controller Overview
The HD44780U is a universal LCD display controller/driver that acts as a bridge between a microprocessor and a character LCD display. It’s designed to simplify the complex task of driving LCD displays by handling all the necessary timing, control, and data management operations. This controller has become an industry standard due to its reliability and versatility in handling character-based LCD displays.
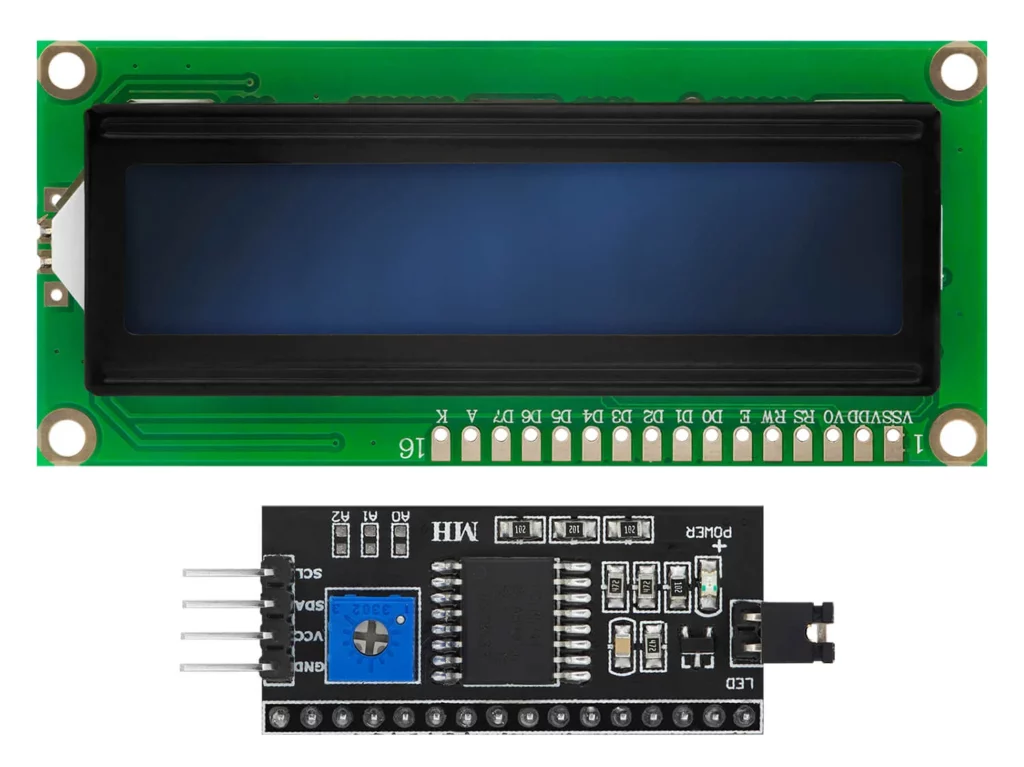
Key Features of the HD44780 Controller
These features make the HD44780 controller an excellent choice for flexible and reliable LCD applications.
Display Capabilities:
- Supports 5×8 and 5×10 dot matrix formats.
- Can display up to 80 characters using display RAM.
- Includes character generator ROM for 240 fonts.
Power and Speed:
- Operates at low power (2.7V–5.5V).
- Supports MPU interfaces at speeds up to 2 MHz.
User-Friendly Design:
- 4-bit and 8-bit parallel data interface modes.
- Programmable duty cycles for various display configurations.
- Automatic reset circuit to initialize the controller at power-up.
HD44780U LCD Controller Architecture
The block diagram represents a comprehensive LCD controller system, the HD44780U, which illustrates the flow of data and control signals between various functional blocks. At its core, it’s designed to interface between a microprocessor and an LCD display, handling all necessary display operations through an organized system of registers, memory, and control circuits.
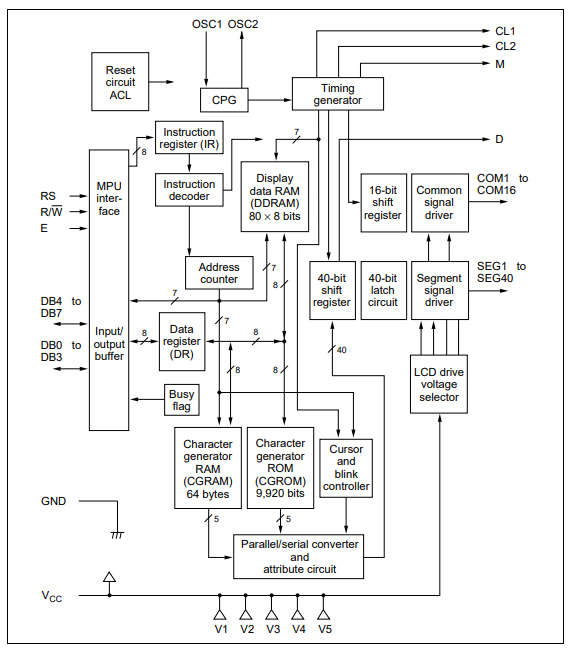
The diagram shows the comprehensive architecture of the HD44780U LCD controller, which consists of three main functional blocks that work together to process and display data.
Input Interface Section
- MPU Interface
- Manages DB0 to DB7 data lines
- Controls RS (Register Select) and R/W (Read/Write) signals
- Handles input/output buffering
Central Processing Section
- Control Components
- Instruction register and decoder
- Data register
- Address counter
- Busy flag management
- Memory Units
- Display data RAM (80 x 8 bits)
- Character generator ROM (9,920 bits)
- Character generator RAM (64 bytes)
Display Output Section
- Display Control
- Timing generator providing CL1 and CL2 signals
40-bit shift register - Segment signal lines (SEG1 to SEG40)
- Common signal outputs (COM1 to COM16)
- Timing generator providing CL1 and CL2 signals
HD-I2C-LCD Control with PIC16F877A: Demonstrating LCD Functions and Custom Characters
This implementation controls an HD-I2C-LCD using the I2C interface on a PIC16F877A microcontroller. It demonstrates core LCD functions such as text printing, custom character creation, scrolling, and cursor control. The program includes custom characters (smiley and laughing faces) and cycles through various demonstrations for user interaction. LCD configuration and addressing are handled through specialized functions with precise delay constants.
JHD LCD Header File: Command Definitions and Function Prototypes
This header file defines essential commands and configurations for controlling the HD-I2C-LCD, including display, cursor, and function settings. It offers functions to initialize the LCD, clear the display, manage display control, enable/disable scrolling, and create custom characters. The file also allows users to control cursor movement, text direction, and print characters or strings. Each function is linked to specific commands for smooth operation of the LCD. You can find the file .c in the YouTube video.
#ifndef JHD_LCD_H
#define JHD_LCD_H

#include <xc.h>

// LCD Commands
#define LCD_CLEARDISPLAY      0x01
#define LCD_RETURNHOME        0x02
#define LCD_ENTRYMODESET      0x04
#define LCD_DISPLAYCONTROL    0x08
#define LCD_CURSORSHIFT       0x10
#define LCD_FUNCTIONSET       0x20
#define LCD_SETCGRAMADDR      0x40
#define LCD_SETDDRAMADDR      0x80

// LCD Entry Mode
#define LCD_ENTRYRIGHT        0x00
#define LCD_ENTRYLEFT         0x02
#define LCD_ENTRYSHIFTINC     0x01
#define LCD_ENTRYSHIFTDEC     0x00

// LCD Display Control
#define LCD_DISPLAYON         0x04
#define LCD_DISPLAYOFF        0x00
#define LCD_CURSORON          0x02
#define LCD_CURSOROFF         0x00
#define LCD_BLINKON           0x01
#define LCD_BLINKOFF          0x00

// LCD Cursor Shift
#define LCD_DISPLAYMOVE       0x08
#define LCD_CURSORMOVE        0x00
#define LCD_MOVERIGHT         0x04
#define LCD_MOVELEFT          0x00

// LCD Function Set
#define LCD_8BITMODE          0x10
#define LCD_4BITMODE          0x00
#define LCD_2LINE             0x08
#define LCD_1LINE             0x00
#define LCD_5x10DOTS          0x04
#define LCD_5x8DOTS           0x00

        // Function prototypes
void LCD_Init(unsigned char lcd_addr);
void LCD_Clear(void);
void LCD_Home(void);
void LCD_Display_ON(void);
void LCD_Display_OFF(void);
void LCD_Cursor_ON(void);
void LCD_Cursor_OFF(void);
void LCD_Blink_ON(void);
void LCD_Blink_OFF(void);
void LCD_ScrollDisplayLeft(void);
void LCD_ScrollDisplayRight(void);
void LCD_LeftToRight(void);
void LCD_RightToLeft(void);
void LCD_AutoScroll_ON(void);
void LCD_AutoScroll_OFF(void);
void LCD_CreateCustomChar(unsigned char location, unsigned char* charmap);
void LCD_SetCursor(unsigned char col, unsigned char row);
void LCD_Print_Char(char c);
void LCD_Print_String(const char* str);
void LCD_Command(unsigned char cmd);
#endif
Initialization and Configuration for HD-I2C-LCD Control
Part 1 of the code includes essential header files (xc.h, stdio.h, i2c.h, and jhd_lcd.h) to configure the I2C interface and control the LCD. It defines constants such as the LCD’s I2C address and delay values for various operations, along with variables for controlling scrolling and auto-scrolling actions. Additionally, two custom characters (smiley and laughing smiley) are defined, and function prototypes for various LCD demonstrations are declared.
#include <xc.h>
#include <stdio.h>
#include "i2c.h"
#include "jhd_lcd.h"

/* Constants */
#define LCD_ADDRESS     0x7C         // I2C address for the LCD
#define DELAY_SHORT     500         // Short delay (in ms)
#define DELAY_MEDIUM    1000        // Medium delay (in ms)
#define DELAY_LONG      2000        // Long delay (in ms)
#define DELAY_EXTRA     3000        // Extra long delay (in ms)
#define SCROLL_COUNT    5           // Number of scrolls for scrolling demos
#define AUTOSCROLL_COUNT 10         // Number of auto-scroll characters to print

/* Custom Character Definitions */
const unsigned char SMILEY[8] = {
    0b00000, 0b01010, 0b00000, 0b00000,
    0b10001, 0b01110, 0b00000, 0b00000
};

const unsigned char LAUGHING_SMILEY[8] = {
    0b00000, 0b01010, 0b00000, 0b00000,
    0b10001, 0b11111, 0b01110, 0b00000
};

/* Function Prototypes */
void systemInit(void);             // Initialize system and LCD
void demoBasicPrinting(void);      // Demonstrate basic text printing and custom characters
void demoAutoScroll(void);         // Demonstrate auto-scroll functionality
void demoCursorControl(void);      // Demonstrate cursor and blink control
void demoDisplayControl(void);     // Demonstrate display on/off control
void demoTextDirection(void);      // Demonstrate text direction control
void demoScrolling(void);          // Demonstrate scrolling
void demoHomeCommand(void);        // Demonstrate home command
Main Function and Demonstrations: Displaying Features on the HD-I2C-LCD
The main function initializes the system and LCD by calling systemInit() and then enters an infinite loop, continuously cycling through demonstration functions to showcase different LCD features. The systemInit() function sets up the I2C interface, clears the display, and creates custom characters (smiley and laughing smiley). Demonstration functions include demoBasicPrinting, which displays text and custom characters, demoAutoScroll for auto-scrolling text, and demoCursorControl to enable/disable the cursor and its blink feature.
/**
 * @brief Main program entry point
 */
void main(void) {
    systemInit();

    while (1) {
        demoBasicPrinting();      // Show basic printing and custom characters
        demoAutoScroll();         // Demonstrate auto-scrolling text
        demoCursorControl();      // Demonstrate cursor and blinking controls
        demoDisplayControl();     // Show display on/off functionality
        demoTextDirection();      // Test text direction control
        demoScrolling();          // Scroll text left and right
        demoHomeCommand();        // Test home command (reset cursor)
    }
}

/**
 * @brief Initialize system components and custom characters
 */
void systemInit(void) {
    I2C_Master_Init();          // Initialize I2C master interface
    LCD_Init(LCD_ADDRESS);      // Initialize LCD with specified I2C address
    LCD_Clear();                // Clear the LCD display

    // Initialize custom characters
    LCD_CreateCustomChar(0, SMILEY);         // Create smiley character
    LCD_CreateCustomChar(1, LAUGHING_SMILEY); // Create laughing smiley character
}

/**
 * @brief Demonstrate basic text printing and custom characters
 */
void demoBasicPrinting(void) {
    LCD_Clear();                 // Clear the screen
    LCD_SetCursor(0, 0);         // Set cursor to the first row, first column
    LCD_Print_String("Hello! Like");  // Print a message
    LCD_SetCursor(0, 1);         // Move cursor to the second row, first column
    LCD_Print_String("SUBSCRIBE ");  // Print another message

    // Display custom characters (smiley and laughing smiley)
    LCD_Print_Char(0);           // Print the first custom character
    LCD_Print_Char(1);           // Print the second custom character
    LCD_Print_Char(0);           // Print the first custom character again

    __delay_ms(DELAY_EXTRA);     // Wait for the specified extra delay
}

/**
 * @brief Demonstrate auto-scroll functionality
 */
void demoAutoScroll(void) {
    LCD_Clear();                 // Clear the screen
    LCD_SetCursor(0, 0);         // Set cursor to the first row, first column
    LCD_Print_String("AutoScroll Test");  // Print a message
    LCD_AutoScroll_ON();         // Enable auto-scroll feature

    // Print some characters while auto-scrolling
    for (int i = 0; i < AUTOSCROLL_COUNT; i++) {
        LCD_Print_Char('.');     // Print a dot
        __delay_ms(DELAY_SHORT); // Wait for short delay
    }

    LCD_AutoScroll_OFF();        // Disable auto-scrolling
    __delay_ms(DELAY_LONG);      // Wait for a long delay
}

/**
 * @brief Demonstrate cursor and blink control
 */
void demoCursorControl(void) {
    LCD_Clear();                 // Clear the screen
    LCD_SetCursor(0, 0);         // Set cursor to the first row, first column
    LCD_Print_String("Cursor ON");  // Print cursor on message
    LCD_Cursor_ON();             // Enable cursor visibility
    __delay_ms(DELAY_MEDIUM);    // Wait for medium delay

    LCD_SetCursor(0, 1);         // Set cursor to the second row, first column
    LCD_Print_String("Blink ON");  // Print blink on message
    LCD_Blink_ON();              // Enable cursor blink
    __delay_ms(DELAY_MEDIUM);    // Wait for medium delay

    LCD_Blink_OFF();             // Disable blink
    LCD_Cursor_OFF();            // Disable cursor visibility
    LCD_Clear();                 // Clear the screen
    LCD_SetCursor(0, 0);         // Set cursor to the first row, first column
    LCD_Print_String("Cursor/Blink OFF"); // Show cursor/blink off message
    __delay_ms(DELAY_LONG);      // Wait for a long delay
}
Proteus Configuration :
- Open Proteus & Create New Project and click next
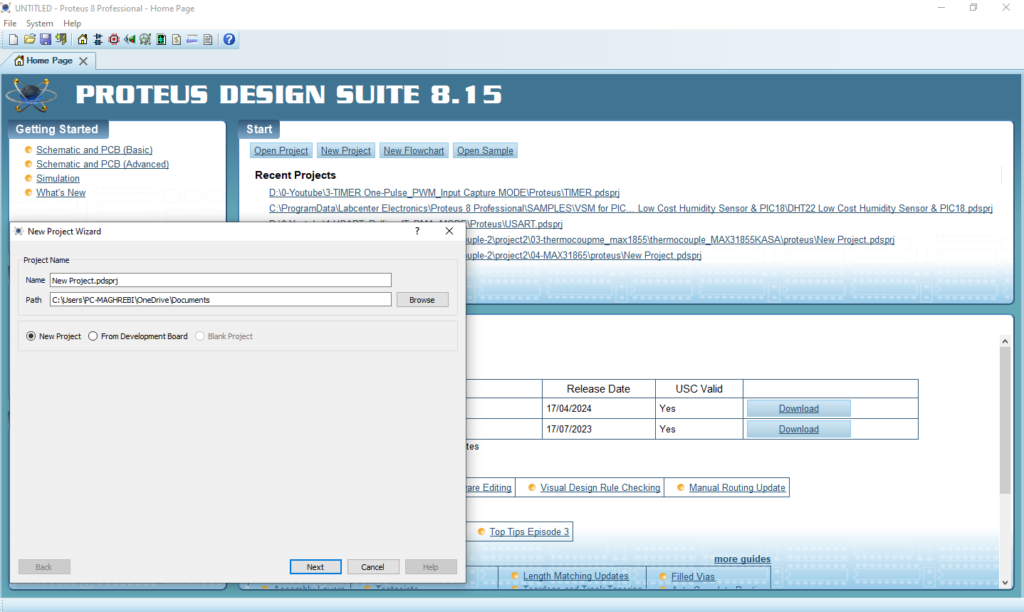
- Click on Pick Device
- Search for PIC16F877A & JHD-2X16-I2C & Resistance
- Click on Terminal Mode then choose (DEFAULT & POWER &GROUND)
- finally make the circuit below and start the simulation
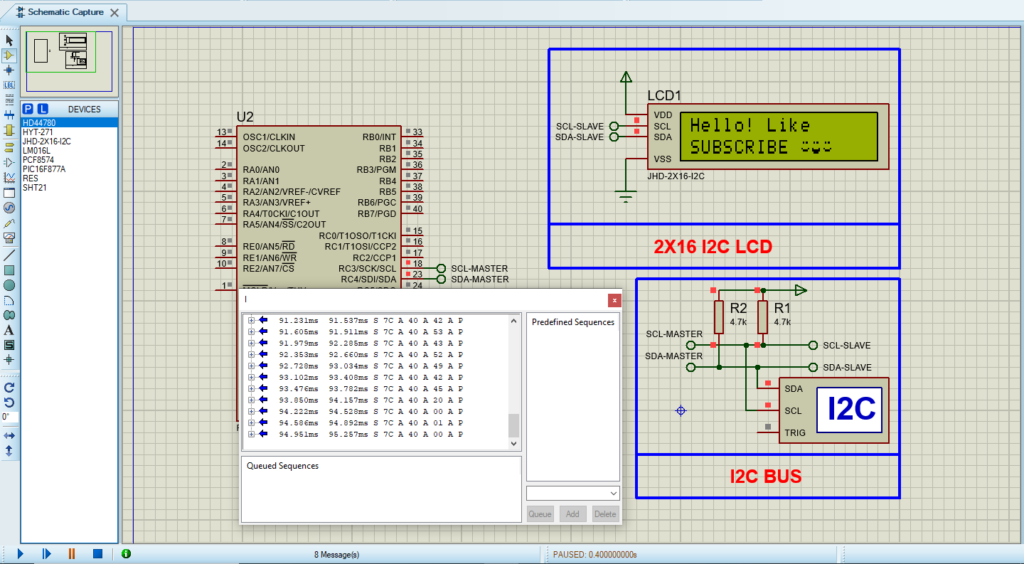
That’s all!
If you have any questions or suggestions don’t hesitate to leave a comment below

2 comments
[…] The code initializes the sensors and LCD, retrieves temperature and humidity data from both the HYT271 and SHT21 sensors, and displays the values on the LCD screen. The first row of the display shows the data from the HYT271 sensor, while the second row displays the data from the SHT21 sensor. A 1-second delay is implemented between readings to ensure continuous updates on the display. For further details on the display library used in this project, you can find it here. […]
[…] Hitachi HD44780 controller. Additionally, related projects like “I2C-LCD” and “JHD-2X16-I2C LCD” further explore variations and enhancements in LCD […]